
Tom Waits has a song, “What’s He Building in There?” about a man wondering what goes on behind his neighbor’s garage door.
He hears a router, the whine of a table saw and smells “enough formaldehyde to choke a horse,” clues that only deepen the mystery of what’s going on behind that door?
I can’t help but think this must be what it’s like to live next door to director Evan Glodell and his co-conspirator/DP, Joel Hodge. Their feature, Bellflower, (2011), oozes a do-it-yourself menace, like leaded gasoline slow dripping onto the driveway from an old Buick, one long smoking burnout across our collective retinas.
Glodell’s deviant vision is responsible for much of this, yet a huge part of the film’s searing impact is in the way it looks. Glodell builds his cameras out of cast-off parts and abandoned technology—like the ‘Coatwolf Model II’ ultra large format optical system used on Bellflower—a camera that the good Dr. Frankenstein might’ve created had he been raised on ’80s action movies and handfuls of Ritalin before metal shop.
Ultimately, it’s one thing to build a badass camera and another thing entirely to know how to actually use it; to possess the talent, knowhow and sheer huevos to squeeze every last ounce of performance from that sweet machine. That’s the solemn duty of Independent Spirit Award nominee DP Hodge, who alchemizes light into something resembling battery acid and napalm—mixed together in that mysterious Ventura, CA garage. Like all visionaries, these men are understandably protective of their creations. But after a half-rack of Olympia and three gas cans, Evan and Joel agreed to part with a small piece of that action for the greater good of moviemakers everywhere. Take it away, boys… —Brian O’Hare, Editor-at-Large
When MovieMaker came to us asking if we could do an article on how to build your own camera, I had a few ideas that were all either too complex for a single article, or too simple to be useful. I have spent countless hours in the last 10 years trying to figure out different ways to build unique lenses and cameras. One of the first challenges I came across was figuring out how to make a focusing mechanism. After driving myself insane building a lot of devices that were basically useless, I came across this idea, and it changed my life just a tiny bit. If we were going to do this, I wanted to write about something that would actually be useful to most moviemakers: a lens with a customizable macro bellows.
This is not a traditional step-by-step tutorial with exact specs, part names and numbers. That would defeat the point. This is a broad how-to that will give you the basic knowledge to experiment and build something that is completely unique to you—the only limitation being how much time and effort you want to put into it.
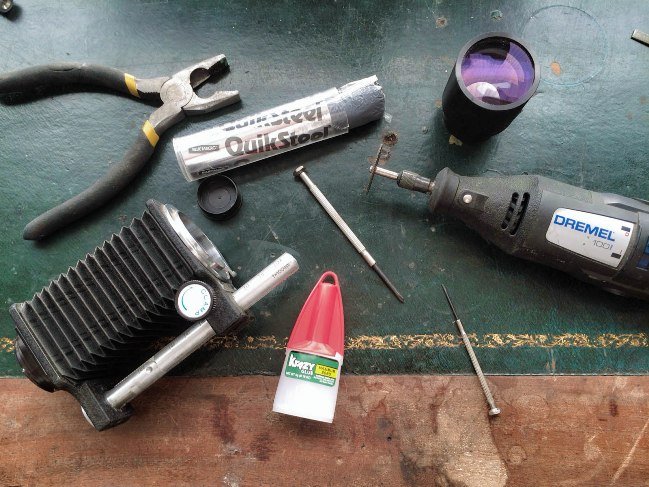
I am writing this for the basic tinkerer who is probably just starting out. That’s where I was when I first started making things like this. All you need is some glue, a rotary tool, and a screwdriver. And a pair of pliers and a hammer, maybe, to rip things apart when you don’t have the right tiny screwdriver. If you’re an experienced builder, once you get the basic concept of how the optics work, you probably won’t need to refer very much to my instructions. After you make this simple version, you can easily scale up and make a million variations.

The Coatwolf Special 101, i.e. a modified macro bellows with a crappy (non-photography) lens glued to it
What we are doing is modifying a device called a macro bellows to accept any lens you feel like attaching to it. Macro bellows mount your lens further away from your camera so you can focus on extremely close and small things—a sort of universal focusing device. Once you attach the lens, you just turn the knob to focus from infinity to an extreme close-up. We use dozens of different variations of these on many of our cameras, and we love them.
Why should you bother making this? Because it’s much more useful than it seems at first glance. There is an almost unlimited supply of unusual (and often cheap) lenses out there that are useless to photographers and moviemakers because they were designed without a built-in focusing mechanism. This fairly simple trick can give you access to all of them. Be careful if you are a gear junkie—you could go insane for the rest of your life trying to track down magical lenses.

The strange lenses I have collected over the years. I paid little to nothing for most of them, and have no idea what many of them were originally used for
Step One: Acquire a Macro Bellows
A bellows is the expandable part of a camera that allows a lens to be moved nearer to or further from the focal plane. The further away your lens is from the focal plane, the closer it will focus. A bellows mounts on the front of your camera, and then your regular lens mounts on the front of the bellows. You now have a macro lens.

A macro bellows mounted the way it was intended for macro photography
There are a million different versions of bellows available for purchase. Some of the older antique ones can be bought on eBay or junk stores for very cheap, and because of their simplicity they are often easier to work with.
Step Two: Choose the Right Lens
This may be the most involved step, but only because of how many different kinds of lenses there are in the world. Most people unaware that the majority of lenses are not very complicated to focus. When you turn the focusing ring, it moves the entire collection of lens elements closer or further away from the lens’ focal plane (usually your camera’s digital sensor). The collection of lens groups doesn’t move in relation to each other. In almost all prime lenses, there is a metal barrel inside with all the glass glued and bolted in place. Zoom lenses are much more mechanically complicated, and I wouldn’t recommend starting with them.
It will take some research along with some trial and error to pick your first lens. Each lens has a specific distance from the back of the lens to where the image comes into focus.
Once you have a lens in hand, go to a wall across from a bright window, point the lens at the window, and move it either closer or further from the wall until you see a clear image projected. The distance between the lens and the wall is your back focus distance.
You need to get that image on your camera’s sensor, and at the right distance where it is in focus.

An illustration: Lord Humungus is outside the window, and the lens makes a tiny upside-down Lord Humungus on the wall
Here’s a quick way of judging the back focus distance, and how big an “image circle” it projects (i.e. how big a camera sensor it will cover). Point the lens at anything bright, like a light bulb, and then project the image onto a piece of paper or even your hand. Once you have played around a little, you will be able to pick up any lens and quickly tell if it can be mounted on your camera.

With some lenses, this distance can be so short that it becomes almost impossible to use without completely ripping your camera apart and redesigning it. The distance can also be many feet with some lenses, projecting a giant dim image that is unusable for most applications.
Another method is to just turn your camera on with no lens attached and hold the lens in front of it to see if you can get a good image. Be careful doing this. You may think the lens is garbage from looking at the image, but once it is properly mounted, and most of the light leaks are gone, it could still make an image that you like.
You can also look up the flange focal distance of your camera (the distance between your lens mount and the sensor inside) and measure it if you prefer to be more precise.
You may look for lenses in old projectors, X-ray machines, unidentified industrial junk, and eBay. Again, lenses often have no use once they are removed from service, and can often be purchased for very little even when they are of extremely high build quality.
Step Three: Mount Them Together
Figure out a way to mount your strange lens to the front of your bellows, then figure out how to attach the whole assembly to your camera.
You may mount the bellows to your camera, and then find that the lens can’t get close enough to get useful focus. Then you start the often frustrating process of taking it apart and figuring out how to shave away additional material to reconfigure things to get more clearance. I have usually have to shave most of the material off the rear mount, and sometimes I have to trim down the paper bellows, or remove them all together. You can achieve a lot with the lens by sliding part of the lens into the bellows, so that it actually slides back into the camera when you focus to infinity. It just depends on the lens you choose and how big it is.
Again, I started with a Dremel rotary tool, screwdriver and glue. This may seem insane, but I started out building things on the floor of my bedroom and with little resources. I have (mostly) moved past glue now, but many of the first things I built this way are still useable, even though they are rough-looking.
The most common challenge you are going to come across is getting the lens close enough to the camera’s sensor to be able to focus to infinity. That is where the grinding tool and some experimentation come in. Wide-angle lenses have short back focus distances by nature, and are usually more difficult. Most longer telephoto lenses have a lot of room to play with.
Attaching your lens mount to the rear of the bellows, so that you can attach it to your camera, is tricky. It needs to be fairly strong so that it doesn’t fall off and destroy all your hard work. Often if I am starting with a macro bellows that doesn’t have the right mount to attach to my camera, I unscrew the mount, and, with a little grinding and drilling, use the same mounting screws to rig the proper mount in place.

I unscrewed the front and rear mounts and set the lens in place. Now all we have to do is grind and glue away until it works
You can scale this idea up (or down) as much as your heart desires.

The big one is a projection lens from an industrial surplus store. I built an entire support structure around it to make it useable. The little one is for a camera with a 16mm sensor, and instead of a macro bellows, I used an old microscope’s focusing rail
I get a little obsessive playing with optics. Most lenses that are made for still photography and motion picture cameras have two things in common: They are doing their best to accurately reproduce whatever you point them at, and with as little distortion as possible. For many applications this works best, but a messed-up image often has unique properties that can convey different feelings and moods, or just make beautiful images in an unexpected or unusual way. So if this sounds like fun, go buy some cheap lenses on eBay and start ripping things apart. MM
You’ll Need:
- Macro Bellows: Search “macro bellows” on eBay. We find them at thrift and junk stores, as well. It’s usually easy to find cheap ones. The older, weird ones are often more interesting and easier to work with. There are expensive ones, but for this project we won’t likely benefit from using them.
- Lens: Also try eBay, thrift stores, industrial surplus stores. Most towns have one of the latter. They are the places that buy all the equipment from various people and businesses when they close, or when they update their machines, or have crazy stuff to get rid of. If you are willing to dig, you can find almost anything.
- Glue: The most fun kind of glue is two-part epoxy sticks. You can find them at any hardware or auto-parts store. You cut a piece off and mush it around in your hands, and it’s like clay for five minutes before it gets rock-hard. It is the easiest way I have found to mount something without fabricating a bracket. It’s not the stickiest thing in the world, so sometimes you can bump it so it pops loose, then just superglue it back in place—all the sudden it becomes much more permanent.
- Extra lens mount: For common DSLRs like Canon and Nikon, I usually buy cheap off brand focal doublers and remove the mount from the rear. Again, eBay can be a cheap easy source. You can also use cheap adapter rings (like a Nikon lens to a Canon body adapter ring) and grind off the Nikon side.
- Rotary tool (I use Dremel): with cut-off wheel and sanding pad
- Basic hand tools. MM
Photographs by Evan Glodell, Joel Hodge and Olivia Taylor Dudley. This article appears in MovieMaker’s Summer 2014 issue.
Share: