You can shoot a narrative film on a phone but you can’t record sound on one and expect to be taken seriously.
Why audiences accept inferior visuals but reject low-quality audio may actually have Darwinian roots: Survival favors the hearing blind over the seeing deaf. But that’s an essay for another Guide. So, for now, take me at my word when I say you need good sound.
Just like costuming, set design, and the rest of the artistic and technical disciplines associated with moviemaking, top-notch sound requires planning. And if you know some basic things to look for (or more accurately, listen for) in pre-production, and subsequently on your shoot, you can improve your production sound greatly. Working with a professional Recording Studio in Melbourne can also make a significant difference, offering expert support to ensure your audio quality matches your creative vision.
Location Sound Challenges
Each location presents its own special challenges audio-wise, and your production sound team needs time to investigate as many as possible before you start shooting. Are you going to encounter issues with traffic in the background? If you can’t use a lavaliere for each character, (you may not have enough of them, or wardrobe doesn’t allow you to hide a mic) how will you record dialogue? Where is the on-set generator, and how will you hide the noise it makes?
The simplest solution is: Go to the locations and listen. Anything you hear beyond your own breath has to be accounted for, because your microphones will pick it up. Remember, in a perfect world the only thing you ever actually record on set is an actor’s voice. Do everything you can to get as close to that serene, sonic state before you even start shooting.
Getting the Right Gear
Optimally, you should have one lav for every character with a speaking role for each scene, and a shotgun mic for each camera. One common amateur move is plugging microphones directly into the camera or DSLR. Don’t do this. Have you ever heard of a camera company touting how great their stuff sounds? Me neither.
Cameras are designed to concentrate their technology on image quality. Keep the camera mic on, but only use that audio to streamline syncing your sound in the editing timeline. Plugging a microphone into a camera solely to save a small amount of money in the short term can easily backfire. Your sound will be vastly improved if you rent or purchase a separate sound recorder. Every rental house that lends out cameras rents stand-alone audio recorders—and they don’t cost much. All audio that your sound editor mixes into the final show should be recorded into a unit like this.
Filling in the Gaps
On set, your sound crew needs just one thing: quiet. For 30 seconds before or after every scene, a sound crew needs to record what is commonly referred to as “room tone.” Don’t let the term fool you, though. Room tone applies to interior and exterior scenes. When recording room tone, make sure that everyone present for a given scene stays on set, perfectly quiet and still. The idea here is that you capture the native sound environment. In a small room with a big crew, even if everyone is dead quiet, their very presence affects the space’s acoustics. And the more confined the space, the more a minor alteration (even something as seemingly negligible as adding or subtracting one crewmember) can affect tone. If you need a professional recording studio, then you may consider checking out this Skunkworks recording studio.
But now you might be asking, why do I need to record room tone? Simply put, your post sound editors will need it for ADR (“Additional Dialogue Recording,” for dubbing quiet or missing lines of dialogue), and for editing out imperfections you may not hear during the chaos of production. Was someone moving around off set? Room tone fills it. Did a cell phone (even on vibrate) go off? Room tone once again comes to the rescue. Did an actor sneeze while his scene partner was delivering her lines? Room tone.
On Set Checklist
Before you start principle photography, you need to make sure your sound team is managing their data effectively and efficiently so that your Data Management Technician (DMT) can actually manage the audio files.
First off, the sound team should be filling out a sound report. Like a script supervisor’s log, the sound recorder (or his assistant) should keep a track of the file names for each take, whether the director liked the take or not, and whether or not there were any issues with the audio—such as a plane flying overhead.
Another task to take care of before the cameras roll is establishing a readable nomenclature for labeling your sound files. If you use the default naming system on most recorders (or cameras for that matter), your equipment will generate something pretty incomprehensible. No one will ever know what file “kl4jsxdf3a9is-001.wav” is. If you rename the files logically (for example “S1T1.wav” for Scene 1, Take 1), there will be a lot less confusion about what video clip a given audio file accompanies.
Identifying Problems Before They’re Problems
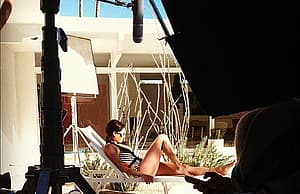
Finally, let me offer you a hint that could save you thousands of dollars. Encourage the mixer to tell you about problems as they happen. Record a wild track right then and there. What’s a wild track, you ask? It’s an audio-only take for recording dialogue or practical sound effects. Maybe you’re shooting a wide exterior shot at a pool. Because the frame doesn’t allow the sound recorder to get close to the action with the shotgun mic, and because your actress—who keeps getting in and out of the pool—can’t wear a lav, you may need to capture just the audio. ADR can cost hundreds of dollars an hour, and since you’ll be in a studio using the studio’s mics, what you record in post may not sound anything like what you captured on set. What’s more, when you do ADR you have to pay your actors for their time—again. Recording wild sound on your shoot, though, can help you minimize your ADR needs, saving you serious money. MM
This article appeared in MovieMaker‘s Complete Guide to Making Movies, 2013.